So how does one actually apply water slide decals? Well I'm glad you asked because I'm going to be doing a short tutorial today on how to use and place water slide decals. First and foremost you need your materials; Decal Sheet, Warm Water in a Shallow Container, Toothpick, Que-Tips, Tweezers, Paper Towel, Small Paint Brush, Exact-o Knife or Scissors, and Micro Sol. Second most and a tip that will save you much time is to make sure all the pieces that you are applying decals to are top coated with a clear gloss. This will give the decal a smooth surface to slide on and stick to when applying the decals.

So the first thing after you have all your materials organized to do is to plan out where your decals are going to go. This is probably the most important step because you don't want to place a decal and realizes you wanted it somewhere else. Once the decal is stuck down it becomes very hard to remove it and replace it with out ruining it. As you can see I had already placed one decal when I took this picture. I like the scheme Bandai laid out in the construction guide so ill be using that. Once I figured out which decal was going on next, I used my Exact-o to cut it out.


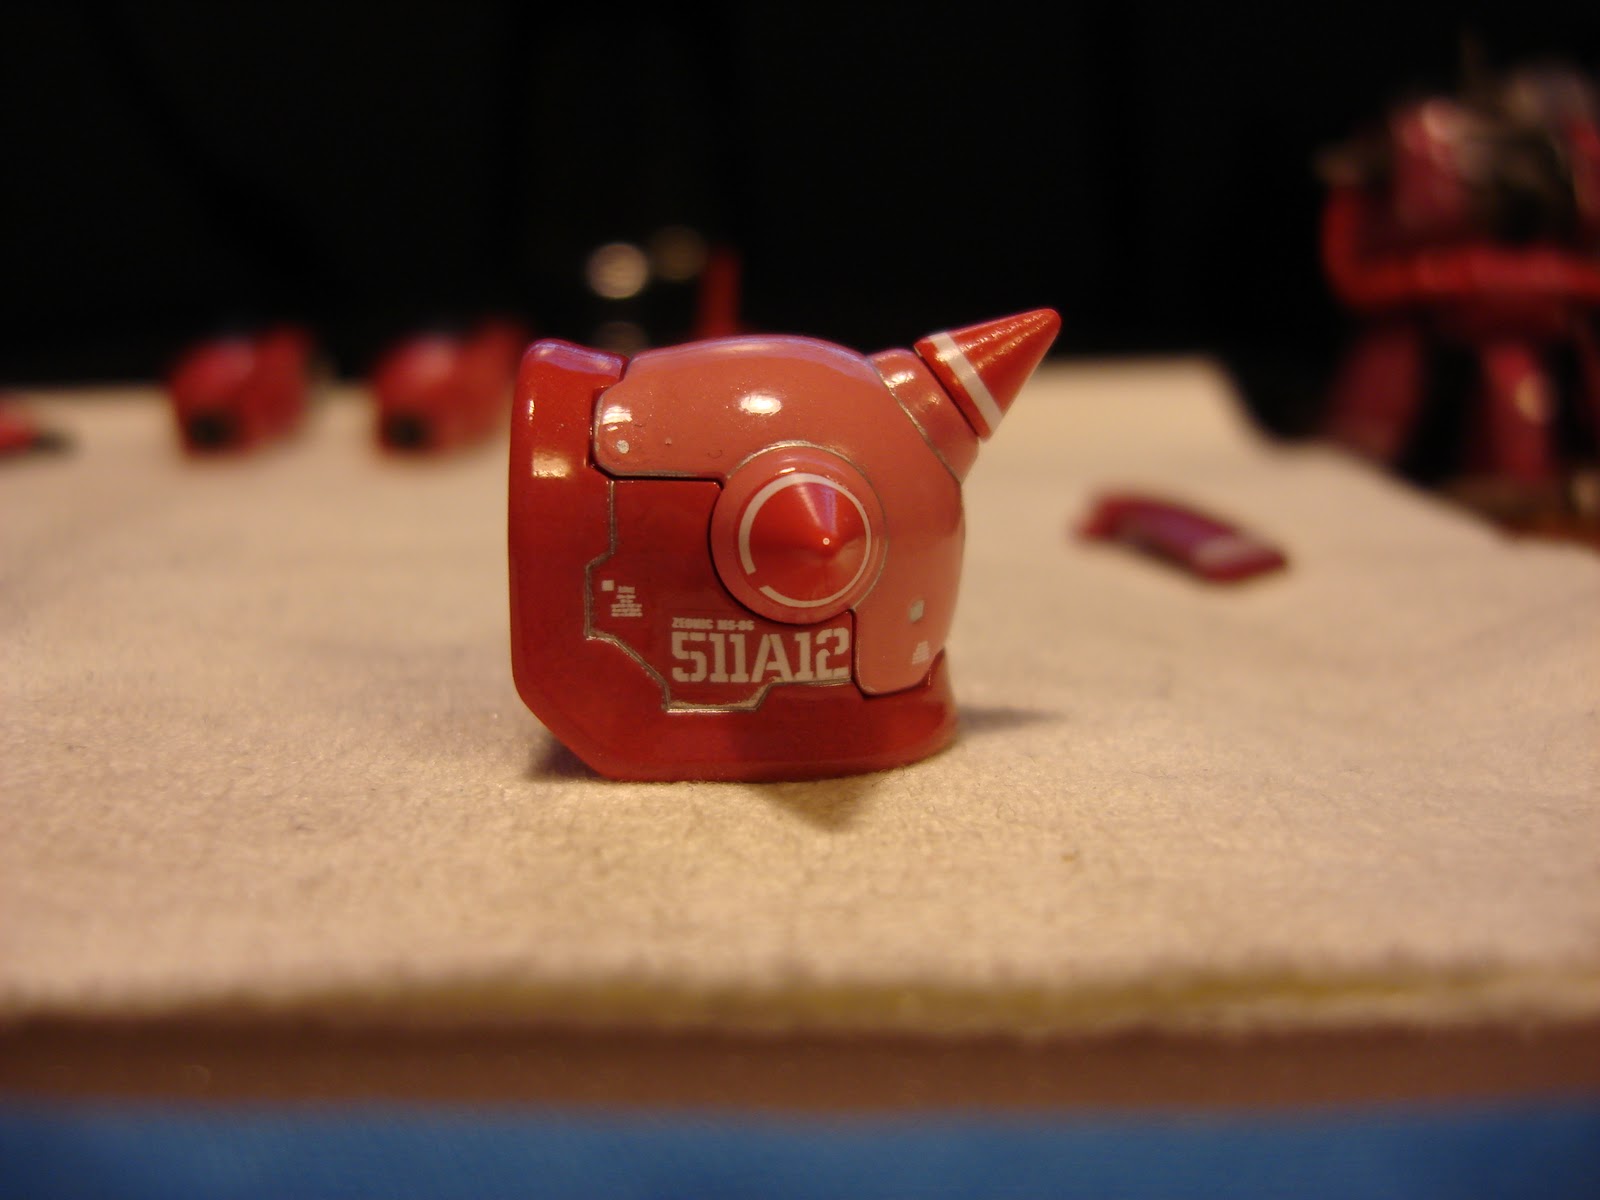
Here you can get an idea of how small these decals are, that is one of the bigger decals on the sheet too! Now that the decal is cut you should place it where you plan to put it, just to make sure that you like the way it looks. As I said before I'm just going with the way Bandai has theirs set up so I already have an idea of what it was going to look like. After you are happy with the placement it is time to soak the decal. Place the decal into your shallow container of water for around 5-7 seconds. You don't want to leave the decal soaking for too long because the glue thats used to adhere the decal will devolve and the decal will no longer stick.

After a good 5-7 seconds remove the decal from the water and place it on a paper towel for a few seconds just to allow all the excess water to be soaked up. Too much water will make the decal harder to place. Let it sit for a second or two then carefully place the decal onto the model. Tweezer come in handy for this step especially reverse action tweezer (unfortunately I don't own any, I just use my fingers or the exact-o to pick up the decal and place it).

There it is, the decal on the model ready to be slid off. Now this is where a lot of people get confused, how exactly does the decal go from the paper to the model? Well if you have a good set of decals you can look very closely to them and you'll notice that the decals have a clear film around them, this is also part of the decal everything else on the sheet is the glue that holds the decal to the backing. The glue softens with water allowing you to slide the decal off the backing (sometimes you'll notice if your hands are a bit moist they will stick to the decal sheet so you should be careful when handling the decal sheet). So in order to slide off the decal I use a dulled down toothpick, you don't want it to be sharp it may damage the decal. I gently push at the decal with the toothpick until it begins to slide then I push the decal right off the backing onto the model.

In this picture you'll notice that the decal is half on the paper and half off, I did this to demonstrate that the decal will slide off the backing. Once the decal is off the backing entirely you can begin to position it where you want it. Great thing about water slide decals is you have a bit of time to position and reposition the decal before the glue sets. Once you have the decal where you like it take your Que-tip or paper towel and dab at the decal to remove any excess water. It is quite easy to accidentally move the decal so be careful not to in the dabbing process. If you do however move the decal in this process it isn't too hard to go back re-wet the decal and position it back (I use the paint bush to brush on more water if this happens). Once the decal is dry it should be stuck to the model. I usually let the decal sit for a bit before going to the next step.

Woot, decal is stuck down! Most decal glue is cheap and will stop working after a while. Its important to set the decals so they don't fall off (decal setter will melt the decal into the plastic). Micro Sol is a decal setter and can be obtained at any hobby shop for no more than three dollars for a bottle that will last you the rest of your life.

With a soft new brush (you don't want to use this brush for anything else) apply a thin coat of Micro Sol to the decal. Make sure to only brush it once or twice, excessive brushing may lift up the decal and break it. Double check to make sure there are no hairs or dust on the decal after you brushed it, you don't want those setting into the decal, it becomes almost impossible to get them out once the setter has dried. Then let the piece sit for an hour while the Micro Sol does its thing. You want it to fully evaporate on its own, touching it may deform the decal. You may notice the decal begin to wrinkle, don't worry this happens it will eventually flatten back out and smooth out.

And there you have it, applying water slide decals while tedious is far worth the effort. I can now put a clear coat over these decals and you wont even be able to tell that they are decals, they will appear to be painted on.
Well thats it for my little tutorial, keep checking back. I will be reviewing the Iwata HP-CS Eclipse sometime next week as well as putting up pictures of the spray booth I built along with plans and material list.
No comments:
Post a Comment